So, you’ve got a dream of escaping the noise, unplugging a little, and building your very own tiny wood cabin, but your budget is tight. Maybe you’ve got $20,000 saved, maybe a bit less, but you’re itching to build something with your own hands, something that doesn’t drown you in debt. Sounds familiar? Great, you’re in the right place.
Whether you want a weekend getaway, a backyard writing nook, a cozy guest house, or even a minimalist full-time home, this guide is going to walk you through how to build a tiny wood cabin for under $20K step by step.
Let’s roll up our sleeves and get into it.
Step 1: Get Clear on Your Cabin’s Purpose and Size
Before you hammer a single nail or spend a single dollar, sit down and decide what you’re building this cabin for. Is it for weekend trips? Is it for Airbnb income? Are you planning to live in it full time? Or is it just a cool hobby project for your property?
Your “why” is going to shape every choice moving forward everything from square footage to insulation to how many windows you add.
For a $20K budget, you’re most likely looking at something in the 100 to 400 square foot range. Anything much bigger, and costs start to spiral.
Most folks end up with a cabin around 200–300 sq ft, which is surprisingly roomy if you design it smart. It’s just enough space for a bed, a kitchenette, a small table, and maybe even a bathroom if you plan carefully.
Step 2: Choose the Right Location (and Check Zoning Laws)
Let’s say you’ve got land already awesome! If you don’t, you’ll need to factor in that cost (or look into family property, rentals, or partnerships). Either way, you’ll need to find a flat-ish, dry area with good sunlight and ideally access to water.
Before you do anything else, check with your local zoning office. Seriously, don’t skip this. Some places are totally fine with small cabins, and others have restrictions on square footage, utilities, or foundation types.
Ask about:
- Minimum building size
- Utility hookups
- Septic requirements
- Off-grid rules
- If you need a permit at all
The last thing you want is to build your dream and have someone tell you to tear it down.
Step 3: Decide on Off-Grid vs. On-Grid Utilities
This decision plays a huge part in how much you’ll spend.
If you’re building off-grid, you might use:
- Compost toilet ($100–$500)
- Rainwater collection or water tote ($200–$800)
- Propane for cooking/heating ($100–$400 setup)
- Solar panels with battery (a basic setup can be $500–$2,000)
If you go on-grid, you’ll need to pay for utility hookups (which can be $2,000+ just for water or electricity in some places). Sometimes you can mix off-grid power with a grid-connected well.
For a sub-$20K cabin, many folks go fully off-grid at first, and upgrade later if needed.
Step 4: Design a Simple, Smart Floor Plan
The simpler your design, the more money you’ll save.
Avoid complex shapes, dormers, or custom trusses unless you really know what you’re doing. A square or rectangle footprint is your best friend here.
Here’s a basic 12×20 layout (240 sq ft) that works well:
- One main open room for sleeping, cooking, and living
- Loft space (if you’re comfy with ladders)
- Tiny bathroom with compost toilet and small shower
- Covered porch for added outdoor living without much cost
Want to squeeze out more savings? Skip the bathroom completely and use an outhouse, or install a basic outdoor shower and a dry toilet setup.
You can use free design tools online (like SketchUp or Floorplanner), or even sketch it on paper. Just make sure you plan out your wall lengths, door/window placements, and furniture flow.
Step 5: Choose Your Foundation
For most tiny wood cabins, there are three low-cost foundation types to consider:
1. Concrete Blocks/Piers
- Easiest and cheapest
- You use concrete blocks or poured piers at load points
- No full foundation needed
- Perfect for areas with good drainage
2. Skid Foundation
- Great for portability
- Uses large wooden skids or treated beams
- Cabins can be moved if needed
3. Gravel Pad + Treated Base
- Level out a pad of crushed gravel
- Build directly on top with pressure-treated wood
- Fast and simple
All of these options can cost under $1,000 if you DIY. Just make sure your base is level and secure, and elevate off the ground to prevent rot and water damage.
Step 6: Frame It Up – Walls, Floor, and Roof
This is where your cabin starts to feel real.
Buy standard 2×4 or 2×6 framing lumber from your local lumber yard or big box store. If you’re really on a tight budget, check Facebook Marketplace, Craigslist, or salvage yards for secondhand materials. Barn wood and pallet wood can be repurposed for trim and accent walls.
Here’s what you’ll need:
- Floor joists and subfloor (usually 3/4″ plywood or OSB)
- Wall studs spaced 16” apart
- Top/bottom plates
- Headers for doors and windows
- Roof trusses or rafters (you can buy prefab or build your own)
Framing costs usually range from $3,000–$6,000, depending on size and materials. You can save hundreds by doing it yourself with a circular saw, drill, and a good level.
Pro tip: Invite a few friends over for a weekend “wall raising.” Pizza and beer are cheaper than hiring labor!
Step 7: Roof It (and Don’t Cheap Out Here)
If there’s one area you shouldn’t go budget-basement, it’s the roof. A leaky roof will ruin everything.
You’ve got a few low-cost but durable options:
- Corrugated metal roofing – Easy to install, lasts decades
- Asphalt shingles – More traditional look, decent lifespan
- EPDM rubber roofing – Best for flat or low-slope roofs
Expect to spend $500–$1,500 on roofing materials depending on what you choose.
Make sure you install proper flashing and overhangs to keep water out. Vent the roof if you’re insulating.
Step 8: Sheath and Wrap the Structure
Once the frame is up, you’ll need to sheath the cabin to strengthen it and prep for siding.
Use OSB or plywood panels for wall and roof sheathing. Then cover the whole thing with a weather-resistant barrier (like Tyvek) to keep moisture out but let vapor escape.
This phase is satisfying. Your cabin will actually start looking like a real house.
Step 9: Install Doors and Windows
Look for secondhand doors and windows to save big. You can often find them on Craigslist or ReStore for 50–80% off new prices.
Standard sizes are easier to frame around. Try to go with double-pane windows for better insulation if you’re using the cabin in cold weather.
You can budget around $500–$1,500 total for doors and windows, depending on how fancy you get.
Install everything with good flashing and sealant to avoid leaks later on.
Step 10: Insulate and Finish the Inside
This is where your tiny wood cabin starts to feel cozy.
Insulation Options:
- Fiberglass batts – Cheap and easy to install
- Foam board – More expensive but great R-value
- Spray foam – Expensive but super airtight
If you’re using the cabin year-round, don’t skip this step. Insulating your walls, roof, and floor properly will make your cabin livable in any season.
After insulation, you can:
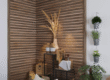
- Cover the walls with wood paneling, shiplap, or plywood
- Build a basic kitchenette
- Add shelving and storage nooks
- Use laminate flooring, vinyl planks, or even painted plywood
This phase can run $1,000–$4,000, depending on how simple or detailed you go.
Step 11: Add Heating, Cooling, and Electricity
If you’re staying off-grid, you can keep this super simple:
- Wood stove or propane heater for warmth
- Solar-powered lights
- Battery bank or solar generator for charging devices
If you’re on-grid, you can wire basic outlets and lights yourself (in many areas, as long as it passes inspection), or hire a licensed electrician for $500–$2,000, depending on the setup.
Some people go with battery-operated lights, USB outlets, and portable solar panels to keep it minimal and under budget.
Step 12: Build Simple Furniture or Go Secondhand
Don’t blow your remaining budget on furniture. Your tiny cabin doesn’t need much.
Check thrift stores, garage sales, and marketplaces for:
- Fold-down tables
- Futons or daybeds
- Storage benches
- Mini fridges and burners
Even better is to build your own stuff from scrap wood. A folding table, a wall-mounted desk, or a bench with storage can go a long way.
Step 13: Add Personal Touches
This is the fun part.
Hang string lights from the porch. Throw in a few cozy pillows. Add a hammock out front. Mount a little shelf for your favorite books or a plant. Build a fire pit outside for those long, quiet nights under the stars.
These things don’t cost much, but they make your cabin feel like yours.
Sample Budget Breakdown (To Stay Under $20K)
| Item | Estimated Cost |
| Foundation (gravel, blocks) | $700 |
| Framing Lumber | $3,500 |
| Roof Materials | $1,200 |
| Sheathing + WRB | $800 |
| Doors & Windows | $1,000 |
| Insulation | $1,200 |
| Interior Finishes | $2,500 |
| Off-Grid Power Setup | $1,500 |
| Plumbing (basic or dry) | $1,000 |
| Kitchenette + Fixtures | $1,300 |
| Furniture & Decor | $800 |
| Tools & Fasteners | $1,000 |
| Contingency/Emergencies | $2,500 |
| Total | $19,500 |
Final Tips for Saving Money
- Use reclaimed or secondhand materials
- Build it yourself or with friends
- Keep the design simple and boxy
- Skip plumbing if possible
- Do it in phases—add solar or water later
- Don’t rush—watch for deals, sales, and freebies
Building a tiny wood cabin doesn’t have to mean going into debt or compromising on quality. With smart planning, a clear vision, and a little sweat, you can create something you’ll be proud of for years on your own terms.
And hey, when you’re done and sitting on your porch with a coffee in hand, watching the trees sway, there’s a special kind of pride knowing you built this from the ground up.
Oh, and once you’re settled in, don’t forget to look into hvac cleaning services to keep the air fresh and healthy inside your new cabin.
Article provided by: Katherine Langford